

Send Message
Privacy statement: Your privacy is very important to Us. Our company promises not to disclose your personal information to any external company with out your explicit permission.

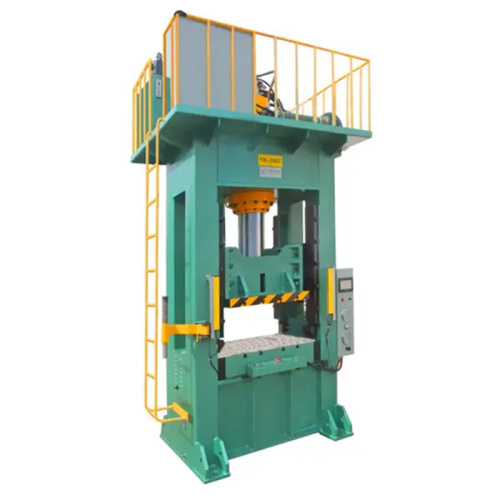
The 50T Press is engineered to deliver consistent, uniform pressure across every application, eliminating uneven densities and improving production reliability. With dependable force distribution, it helps create more consistent results, reduce quality issues, and maintain high standards from one cycle to the next. Whether used for compression, forming, molding, or other demanding applications, this powerful press supports efficient operation and repeatable performance—so you can achieve high-quality results with greater confidence and no more concerns about inconsistent density.


Uneven density can make a pressed part look fine on the outside while creating weak spots inside. In a workshop, that may lead to inconsistent thickness, poor bonding, surface marks, or parts that perform differently from one batch to the next.
I see this issue often when the material is loaded unevenly, the mold is not supported across its full area, or the press applies force faster than the material can settle. A 50T press can help create a more controlled process, but the result still depends on the tooling, material, pressure area, and working method.
A 50-ton hydraulic press applies up to 50 tons of force across the pressing area. The actual pressure on the material changes with the mold size. A smaller pressing area receives more pressure than a larger one, so the press capacity should always be matched with the mold and material requirements.
Here is how I approach density control.
Moisture, particle size, temperature, and material distribution can all affect density.
For powder, I check whether the particles are spread evenly across the mold. For rubber, composite sheets, or layered materials, I look for gaps, folds, and areas with different thicknesses. A simple weighing step can also show whether each mold receives a similar amount of material.
When the input varies, the finished part will often vary as well. The press cannot fully correct an uneven charge.
I spread the material across the mold instead of placing it in one pile. For larger molds, a short leveling step can reduce high and low areas before pressure is applied.
The mold should sit flat on the press bed. If the base is not supported evenly, the ram may apply more force to one side. That can create a part with different density from edge to edge.
A fast press cycle may trap air or move the material before it has settled. A steady approach gives the material more time to spread through the mold.
I usually watch three points:
The correct cycle depends on the material. A short hold may work for one product, while another may need more time for the structure to settle. The best setting comes from measured trials rather than guesswork.
Uneven density is not always caused by the material. Worn plates, loose guides, damaged mold edges, or an uneven press bed can also affect the result.
Before production, I check:
A level mold and stable support help the 50T hydraulic press transfer force more evenly across the part.
I recommend recording the material weight, mold size, pressure level, hold time, temperature, and finished dimensions.
This makes it easier to compare batches. If one part shows a soft area or a thickness difference, I can trace the change back to the process instead of adjusting several settings at once.
For example, a small workshop producing molded fiber panels may find that the center of each panel is denser than the edges. A review of the process could show that the material is being placed mainly in the center and that the mold support is weak near the sides. Spreading the material more evenly and adding proper support may reduce the variation without increasing the press force.
A 50T press can provide a useful force range for many small and medium pressing jobs. It may suit work such as:
The right choice depends on the required pressure, mold dimensions, material behavior, cycle time, and available workspace.
A 50T rating does not mean every mold will receive the same pressure. If the mold area is too large, the force may be spread over a wider surface. If the material needs controlled heating, the press may also require heated platens or a separate temperature system.
I also treat safety as part of density control. The operator should use suitable guarding, keep hands away from the pressing area, inspect hoses and fittings, and follow the equipment instructions. A stable process protects both the part and the person operating the machine.
Uneven density usually comes from several small process issues rather than one single fault. Material preparation, mold loading, alignment, pressure speed, hold time, and support all matter.
When I use a 50T press, I do not rely on force alone. I match the press to the mold, build a repeatable loading method, monitor the cycle, and check the finished parts with measurements. That approach gives me a clearer path toward more consistent density without making claims that the machine can solve every material or tooling problem by itself.

When I clean a surface, I need more than strong water flow. I need pressure that stays steady from the start of the job to the last section.
Too much pressure can damage paint, wood, seals, or soft stone. Too little pressure leaves dirt behind and adds more work. The right balance helps me clean with better control, less water waste, and more even results.
That is why pressure control matters in daily cleaning work.
Every surface has a different tolerance.
Concrete can usually handle stronger pressure than painted metal. A wooden deck may need a wider spray pattern and a lower setting. Glass, vehicle panels, and outdoor furniture require even more care.
I normally check three points before cleaning:
A high-pressure setting is not a suitable choice for every task. When I work on painted walls, I keep the nozzle farther away and test a small hidden area. This helps me see how the surface reacts before I clean the full section.
Uneven pressure often creates visible marks. One area may look clean while another still shows dirt or streaks.
A stable machine helps reduce this problem. I can move the nozzle at a steady speed instead of stopping to adjust the pressure again and again. This creates a more even finish, especially on large driveways, building walls, loading areas, and commercial floors.
For business users, steady pressure can also make work easier to plan. A cleaning team can estimate the time needed for each area with fewer interruptions.
The nozzle changes the shape and force of the water spray.
A narrow spray can remove tough dirt from hard surfaces, but it may leave marks if I hold it too close. A wider spray covers more area and works well for general cleaning. A rotating nozzle can help with some outdoor surfaces, though I still test it before use.
I keep the following habits:
These small steps help me control the result instead of relying on pressure alone.
Random movement often leads to missed sections and uneven color. I prefer to divide the area into small sections and clean each one with the same pattern.
For a driveway, I move from one edge to the other in straight lines. Each pass overlaps the previous pass slightly. This reduces visible lines and helps keep the cleaning level consistent.
For a wall, I work from top to bottom when suitable. Dirt and water can move downward, so this method may reduce the need to clean the same area twice.
My pace also matters. Moving too quickly leaves dirt behind. Moving too slowly can create surface marks. After a few test passes, I can usually find a speed that gives a balanced result.
A pressure washer cannot maintain steady performance when the water supply is weak or interrupted.
Before starting, I check the hose, inlet connection, and water source. A narrow or damaged hose may restrict flow. A loose connection can allow air into the system and cause pressure changes.
I also avoid sharp bends in the hose. When the water path stays open, the machine can work more smoothly.
This check takes little time, yet it can prevent many interruptions during a cleaning job.
Dust, sand, and small particles can affect water flow. A blocked filter may reduce pressure and place extra strain on the pump.
I inspect the filter based on the machine’s care instructions. I also check the hose, spray gun, nozzle, and connections for signs of wear. If the trigger feels unusual or the spray becomes uneven, I stop and inspect the equipment instead of forcing it to continue.
Regular care does not remove every possible problem, but it helps me find small issues before they affect a full job.
I once worked on a concrete entrance that had dark marks near the parking area. The first test used a narrow spray at a close distance. The dirt came off quickly, but the surface showed uneven lines.
I changed to a wider spray, reduced the pressure slightly, and kept the nozzle at a steady distance. I then cleaned the entrance in sections with overlapping passes. The work took a little more control, yet the finished surface looked more even and the risk of marks was lower.
The lesson was simple: stronger pressure did not create a better result. Better control did.
When I use the same preparation and cleaning steps each time, the results become easier to manage.
My basic process is:
This process works for many outdoor cleaning tasks, though the pressure and nozzle choice still need to match the surface.
Perfect pressure is not about using the highest setting. It is about finding a level that removes dirt while protecting the material. When water flow stays steady, the nozzle matches the task, and the operator follows a clear pattern, the work becomes more controlled and the results become more consistent.

When I work with powder, rubber, ceramic, or other compacted materials, density control is one of the hardest parts of production. A part may look correct on the outside while its inner structure contains weak areas, air pockets, or uneven compression.
A 50T press can help solve this problem when its force, tooling, material feed, and pressure settings are matched to the job. The machine itself does not create perfect results by force alone. Stable production comes from controlling each step.
I start by checking the material.
Powder with different particle sizes may flow unevenly into the mold. Moisture can also change how the material responds under pressure. Before setting the press, I review:
These details affect the force needed for compaction. A setting that works for a small cylindrical part may not suit a wide, thin component.
A 50T capacity gives the press a clear working range for many small and medium-sized forming tasks. The actual usable force depends on the machine design, stroke, mold size, pressure system, and safety limits. I always check the equipment specification before selecting a process value.
The next point is mold filling.
Uneven filling often creates uneven density. One side of the part may receive more material while another side receives less. After pressing, the part can show differences in weight, strength, or shrinkage.
I reduce this risk by controlling the filling process:
A small change in filling weight can affect the final result. For this reason, I prefer measured adjustments instead of changing pressure without checking the material input.
Pressure control matters as well.
A short pressing cycle may leave air inside the part. A fast pressure increase can also create cracks, edge damage, or uneven compression. A controlled rise in pressure gives the material more time to settle inside the mold.
A practical setup may include:
The exact values must come from the material and part design. There is no single pressure curve that fits every application. I use trial samples, density checks, and visual inspection to adjust the cycle.
For example, a small ceramic component may show a smooth surface but still have a lighter center after pressing. When I see this pattern, I check the filling method and the release speed before raising the press force. More force may increase the surface hardness while leaving the inner density problem unchanged.
Measurement turns guesswork into process control.
I recommend checking sample parts at regular intervals. Useful checks may include:
The selected checks depend on the product. A simple weight and dimension record may suit an early trial. A production line may need a wider inspection plan.
A 50T press is also easier to manage when the operator can adjust the main settings without complicated steps. Clear controls help reduce setup mistakes. A visible pressure display, stable hydraulic system, guarded working area, and accessible mold space can make daily operation more practical.
Safety remains part of density control. Operators should use the recommended mold, stay within the rated force, keep hands away from the pressing area, and follow the machine’s operating instructions. Mold damage or misalignment can affect both product quality and personal safety.
Maintenance supports repeatable results.
I pay attention to hydraulic oil, seals, pressure readings, guide parts, and mold alignment. A slow leak may not stop the machine, yet it can create pressure differences between cycles. Worn guide parts may cause uneven loading. Dust around the mold can change the filling height.
A basic maintenance record can include:
These records help connect a product change with a machine condition. That makes troubleshooting faster and more reliable.
When I review a 50T press for density control, I do not look at force alone. I look at the complete process: material preparation, filling, mold design, pressure curve, holding time, release speed, inspection, and maintenance.
The right setup can produce more consistent parts and reduce avoidable rework. The result depends on the application, so test samples and technical data should guide the final settings. A 50T press provides a useful foundation, while careful process control determines how well that capacity serves the product.
Uneven pressure can create problems that are easy to miss at the start.
A machine may still run. A production line may still look busy. Yet the final result can vary from one batch to the next. Coatings may appear uneven, filling volumes may shift, and pneumatic tools may lose power during key steps.
I have seen this happen when a pressure regulator was selected without checking the full operating range. The system worked well during light production, but pressure dropped when several tools ran at once. Small changes became visible in the finished product.
A stable pressure setup gives the process better control. It helps equipment work within its intended range and gives operators a clearer way to spot problems.
Pressure affects more than one machine setting.
In a spray coating line, unstable pressure can change the spray pattern and the amount of material applied. In a filling system, pressure changes may affect flow speed and fill volume. In pneumatic tools, low pressure can reduce force and slow the work.
These issues can lead to:
The right pressure control method helps reduce these risks without adding unnecessary complexity to the line.
I start by looking at how the system operates in daily use, not only at the pressure shown on a machine label.
The key points include:
A regulator that performs well at low flow may not respond in the same way when demand rises. This is why the working range matters more than a single pressure figure.
A simple pressure test during different production stages can reveal a lot. Record the pressure when the line starts, when several tools run together, and when the system returns to a lighter load. These readings help show where pressure loss begins.
Pressure control equipment should fit the application.
A basic regulator may be suitable for a small pneumatic tool. A more responsive unit may be needed for equipment that requires a steady flow. A filter-regulator combination can help when air quality and pressure control are both part of the process.
For applications that need closer monitoring, a pressure gauge or sensor can provide useful feedback. Digital monitoring may help operators identify pressure drops before they affect product quality, though the setup should remain easy to read and maintain.
I also check connection size and flow capacity. A small connection in a high-demand system can restrict flow, even when the regulator itself has a suitable pressure range.
A good pressure setup can still perform poorly when maintenance is overlooked.
Dust, moisture, oil, and particles may affect valves, filters, and seals. A blocked filter can reduce air flow. A damaged seal can create a slow leak that is difficult to notice during a short inspection.
A practical maintenance plan may include:
Clear labels also make daily work easier. Operators should be able to see the normal pressure range, adjustment direction, and basic inspection points without searching through long documents.
Imagine a packaging line with three pneumatic tools. When one tool runs, the system holds a steady outlet pressure. When all three tools operate together, the pressure drops and the filling cycle becomes slower.
The operator may respond by increasing the regulator setting. That can create another issue when only one tool is active. The pressure may then rise above the preferred range.
A better approach is to measure demand across the line, check the regulator capacity, inspect the air supply, and confirm that the pipe size suits the flow. The goal is not to raise pressure without control. The goal is to keep the system within a stable working range as demand changes.
That approach can improve consistency while making fault checks easier for the team.
Pressure is only one part of production quality. Material condition, temperature, equipment setup, and operator adjustments also affect the result.
I treat pressure control as part of the whole process. When the pressure is stable, other settings become easier to review. A team can identify the real source of a problem instead of changing several settings at once.
This saves time during troubleshooting and creates more useful production records.
Consistent pressure supports consistent work. The best setup is not always the most complex one. It is the setup that matches the equipment, handles normal demand, stays easy to monitor, and gives operators enough information to make sensible adjustments.
Many production teams lose time through uneven forming, repeated adjustments, and equipment that does not match the workpiece. A 50-ton hydraulic press can support a more controlled process, but the machine rating alone does not solve every production issue.
I look at the complete workflow: material, tooling, stroke, cycle time, operator access, and maintenance. This helps me decide whether a 50-ton press fits the job and where it can improve daily work.
A 50-ton rating usually refers to the maximum pressing force, not pressure in a fluid line. The actual result depends on the hydraulic system, cylinder size, tooling, and the distance covered during the cycle.
Before selecting the equipment, I check:
For example, a workshop that straightens steel brackets may need a different setup from a shop that presses bearings into housings. Both tasks may fit within a 50-ton range, yet the tooling and stroke requirements can be very different.
A stable pressing process starts with repeatable settings. I recommend recording the force, stroke position, cycle time, and part result during trial runs.
A simple working method can include:
Place the material in the fixture.
Set the required stroke and operating speed.
Apply force in a controlled manner.
Hold the load only for the time required by the process.
Release the force and inspect the part.
Record any variation before the next batch.
This method gives operators a clear reference. It also helps supervisors find the cause of defects instead of changing several settings at once.
A strong press cannot correct poor contact between the workpiece and the die. Uneven tooling may create bending, marks, or off-center loading.
I check that:
A small manufacturer that presses bushings into metal housings may improve its output by using a guided fixture. The fixture keeps the housing aligned while the cylinder applies force. This can reduce tilted parts and repeated adjustments without changing the press capacity.
Maintenance affects production just as much as pressing force. Hydraulic oil, seals, hoses, pins, and guide surfaces need regular checks.
I suggest creating a maintenance sheet with simple items:
The inspection frequency should match the working environment. A dusty fabrication area may need more frequent cleaning than a clean assembly room.
A 50-ton press stores a large amount of mechanical energy. The work area needs suitable guards, stable tooling, clear operating instructions, and trained operators.
I do not recommend placing hands inside the pressing zone during a cycle. Operators should use approved handling tools when the workpiece is small, hot, heavy, or difficult to position. The machine should be used within the manufacturer’s rated limits, and damaged parts should be removed from service until they are checked.
A pressure gauge, if included, can help monitor the process. It should not replace inspection of the workpiece or the machine.
The purchase decision should include more than the listed tonnage. I compare the press specification with the actual job data.
Useful questions include:
A press with a higher rating may not be the better choice if it takes too much space, uses more power, or lacks the stroke needed for the job. A suitable 50-ton model can offer a more balanced setup when the application falls within its working range.
I prefer to measure process results before and after the new press enters production. The data does not need to be complex.
Track:
This creates a clear view of the equipment’s effect. If rejected parts remain high, the issue may come from the fixture, material variation, or operator method rather than the press itself.
A dependable process comes from the right force, suitable tooling, clear settings, and regular checks. A 50-ton hydraulic press can support that process when its specifications match the work and the operating method is controlled.

Uneven density can create problems that are easy to miss at the start. One section may feel firm while another feels soft. A finished part may vary in weight, strength, appearance, or performance from one batch to the next. When customers receive inconsistent products, they often spend extra time checking stock, handling complaints, and adjusting their own production lines.
I focus on density control from the material stage to the final inspection. The goal is simple: each batch should stay within an agreed range, and every result should be supported by clear records.
Step 1: Check the raw material
Raw materials can affect density before production even begins. I check key details such as moisture, particle size, grade, storage condition, and supplier batch information. Materials that absorb moisture may need controlled storage or a drying process before use.
This step helps reduce changes caused by material condition rather than the production process.
Step 2: Keep the process settings stable
Small changes in pressure, temperature, mixing time, filling level, or curing time can affect the final density. I record the settings used for each batch and compare them with the approved production range.
When an adjustment is needed, I prefer to change one factor at a time. This makes it easier to understand the result and prevents several unknown changes from affecting the same batch.
Step 3: Test more than one location
A single test point may not show the full condition of a product. Density can vary between the center and edge, top and bottom, or beginning and end of a production run.
I use a sampling plan that reflects the product shape and production method. Samples may come from different positions and different production times. The exact plan depends on the material, product size, and customer requirements.
Step 4: Compare results with the agreed range
A target value alone is not enough. I also look at the allowed variation between samples. This helps separate a stable batch from one that only meets the target by chance.
For example, a foam component may have an average density close to the requested value, while several pieces still show a wide spread. The average looks acceptable, but the product may not perform consistently during assembly. Reviewing the full set of readings gives a more useful picture.
Step 5: Keep production records easy to trace
Each result should connect to a batch number, production date, material lot, machine setting, operator record, and test method. Clear records make it easier to find the source of a change and respond with facts.
I also review trends across batches. A gradual increase in density may point to material moisture, tool wear, temperature drift, or a change in filling behavior. A trend is often easier to act on than a single failed result.
A practical example comes from molded parts used in equipment assembly. The customer noticed that some parts required more force during installation. The dimensions were within range, but density readings showed a difference between parts made at the start and end of the same run. The production team then checked filling conditions and temperature stability, adjusted the process range, and added samples from both production periods. The variation became easier to track, and later batches showed a narrower spread.
Consistent quality does not come from checking only the finished item. It comes from controlling the material, recording the process, testing representative samples, and reviewing changes before they become a larger issue.
When density stays more consistent, customers can plan production with fewer interruptions. They can also compare batches with greater confidence because the quality decision is based on measured results rather than appearance alone.
We welcome your inquiries: dgliheng168@163.com/WhatsApp +8613509684273.
International Organization for Standardization — 2015 — ISO 4413 Hydraulic Fluid Power General Rules and Safety Requirements for Systems and Their Components
Robert H Todd, Dell K Allen and Leo Alting — 1994 — Manufacturing Processes Reference Guide
James F Shackelford — 2015 — Introduction to Materials Science for Engineers
Serope Kalpakjian and Steven R Schmid — 2014 — Manufacturing Engineering and Technology
Anthony Esposito — 2013 — Fluid Power with Applications
Mikell P Groover — 2020 — Fundamentals of Modern Manufacturing Materials Processes and Systems
Boost productivity by up to 40% with our powerful 50T hydraulic press, engineered for demanding industrial applications. Combining reliable performance, consistent pressure, and efficient operation
The truth about 50T powder presses is that their value depends on more than nominal pressing force. With a maximum capacity of 50 tons, these machines can deliver consistent compaction for a wide r
The 50T Press is designed to help manufacturers achieve up to three times faster production while lowering operating costs. By improving processing efficiency and reducing time per cycle, it enable
Tired of product defects and inconsistent results? Upgrade your production line with our powerful 50-ton hydraulic press, engineered to deliver stable pressure, precise forming, and dependable perf
Email to this supplier

November 21, 2026

November 19, 2026
Contact

Send Inquiry
PRODUCT CATEGORIES
Privacy statement: Your privacy is very important to Us. Our company promises not to disclose your personal information to any external company with out your explicit permission.
Fill in more information so that we can get in touch with you faster
Privacy statement: Your privacy is very important to Us. Our company promises not to disclose your personal information to any external company with out your explicit permission.