

Send Message
Privacy statement: Your privacy is very important to Us. Our company promises not to disclose your personal information to any external company with out your explicit permission.

Experience faster, more powerful cutting with 40T performance today. Designed for precision, efficiency, and smooth results, this high-performance solution helps you complete cutting tasks with greater speed and confidence. Upgrade your workflow and achieve cleaner, more consistent performance with 40T power.


When I run a busy cutting line, slow cycles are not the only concern. Uneven cuts, material waste, and frequent tool adjustments can affect daily output and product quality.
A 40T cutting system gives me the force needed for many demanding materials, while a faster cutting cycle helps keep work moving. The actual result depends on the material, blade design, stroke setting, and operator setup.
With the right configuration, I can use it for tasks such as:
I start by checking the material thickness and hardness. A thin foam sheet may need a different setting from a dense rubber pad. I then choose a suitable die, set the cutting height, and test a small number of pieces before regular production begins.
This approach helps me check three practical points:
A common workshop example is a packaging supplier cutting foam inserts for protective cases. When operators use the correct die and keep the sheet aligned, the 40T force can support clean repeat cuts without relying on heavy manual pressure. The faster cycle also helps reduce waiting time between pieces, though the output still depends on loading, unloading, and material handling.
I pay close attention to safety during operation. The work area should stay clear, the die should be secured, and the machine should be used within its stated capacity. Operators also need training on the control panel, emergency stop, maintenance points, and safe material placement.
Before selecting a machine, I check:
“40T Power, Faster Cuts” describes a practical balance between cutting force and cycle speed. It does not mean every material will cut at the same rate. A suitable setup gives me more consistent results, clearer production planning, and better control over daily work.

Some jobs feel hard because the task is poorly planned, not because the work is beyond your ability. Thick materials, tight spaces, worn parts, and long working hours can slow me down and increase the chance of mistakes.
I start by looking at the job itself. What needs to be cut, removed, drilled, lifted, or shaped? What surface is involved? How much room do I have to work? These questions help me choose a suitable tool and avoid forcing one tool to handle every task.
A practical setup usually includes:
Safety is part of good preparation. I secure the material before making a cut, check the power cable or battery, and keep both hands away from the cutting path. If dust or small fragments may appear, I use suitable protection and improve air flow around the work area.
The way I work also affects the result. I mark the cut before starting. I use steady pressure instead of pushing hard. When the material resists, I stop and check the blade, angle, speed, and support. More force does not always solve the problem. It can cause rough edges, tool wear, or loss of control.
I saw this during a small kitchen renovation. The worker needed to remove old trim near a cabinet wall. A large saw could not fit into the narrow space, so the worker switched to a compact oscillating tool with a suitable blade. He marked the area, supported the trim, and made several controlled cuts instead of trying to finish the job in one pass. The work took less strain, and the cabinet surface remained intact.
This method works across many tasks:
Tool maintenance also matters. I clean away dust after use, store blades and attachments in a dry place, and replace parts that show clear wear. A dull blade often makes a simple job feel much harder. A loose attachment can affect both accuracy and safety.
I also pay attention to comfort. A tool that is too heavy may feel manageable for a few minutes, then become tiring during a longer task. A balanced grip, suitable handle, and manageable weight can help me keep better control. For repeated work, short pauses give my hands and shoulders a chance to recover.
Tough jobs become easier when I match the tool to the material, prepare the work area, and use steady control. I do not rely on force alone. I rely on the right setup, careful handling, and regular checks. That approach helps me work with more confidence while keeping the result clean and consistent.

When I need to improve cutting speed, I do not start by pushing the machine harder. A faster feed rate can raise heat, create rough edges, increase tool wear, and cause more rework. The better approach is to check the material, tool, machine settings, and cutting method as one process.
I begin with the material.
Mild steel, stainless steel, aluminum, wood, and composite panels all react differently during cutting. A setting that works well on mild steel may create heat buildup on stainless steel. Aluminum can clog some teeth or flutes when the tool lacks the right geometry.
I check:
A worn tool often looks like a machine problem. If the teeth are dull, the operator may increase pressure to maintain output. This can slow the cut even more and place extra load on the motor.
I replace or adjust the cutting tool when I see:
The cutting tool must match the job. Tooth count, tooth shape, blade thickness, rake angle, and material coating can all affect cutting performance. A blade with fewer teeth may remove material faster in some applications, while a finer tooth pattern may suit thin sheet or jobs that need a cleaner edge.
Machine setup also matters.
I secure the workpiece before cutting and make sure the guide, fence, or clamp is aligned. Even a small movement can force the tool to slow down. Vibration wastes cutting energy and may damage the edge.
I keep the tool path clear of chips. When chips stay in the cut, they can raise friction and heat. Air flow, coolant, or a suitable chip-removal system can help, based on the machine and material. The correct method depends on the equipment manual and the cutting process.
Feed rate should change in small steps. I record the current setting, make one adjustment, and inspect the result. If the cut becomes cleaner and the tool stays within a safe temperature range, I keep the change. If the motor strains, the tool vibrates, or the edge quality drops, I return to the earlier setting.
A small workshop example shows why this method helps. An operator cutting 6 mm aluminum panels noticed that each cut took longer than expected. The machine had enough power, but chips were collecting around the blade. After cleaning the cutting area, checking the blade condition, and adjusting the feed rate in small steps, the operator achieved a smoother process without forcing the machine. The result came from better setup, not from simply increasing pressure.
I also track the result with simple measurements:
These records help separate a real speed improvement from a short-term change that creates more maintenance later.
Safe cutting should remain part of the process. I use the correct guard, clamping method, protective equipment, and machine settings. I follow the equipment manufacturer’s instructions and stop the machine when vibration, smoke, unusual noise, or tool damage appears.
Better cutting speed comes from balance. The tool must suit the material, the workpiece must stay stable, chips must leave the cut, and the feed rate must match the machine. When I check these points in order, I can improve output while keeping edge quality and tool life under control.

I used to think that getting more work done meant pushing harder. That approach left me tired, slowed my decisions, and often created extra work later.
A better approach is to use the right amount of power for the task, reduce wasted movement, and choose tools that support the way I actually work.
More power does not always mean a better result. The useful question is simple: can I finish the job with less strain, fewer interruptions, and steady control?
Start with the task
I look at the work before choosing a tool or system.
Is the task heavy, repetitive, detailed, or time-sensitive? Does it require force, speed, accuracy, or a mix of these needs? A tool made for large jobs may feel awkward during small repairs. A compact option may be easier to control but less suitable for long periods of heavy use.
This small check helps me avoid paying for features I may not use.
Match power to the workload
Power should support the job, not make it harder.
For a light home repair, a compact drill may provide enough power and better handling. For thick wood, masonry, or repeated use, a stronger model can reduce the effort placed on the user. The right choice depends on the material, task length, and working conditions.
I also check how the power is delivered. Smooth control matters when I work near edges, corners, or delicate surfaces. A tool that starts gently can help reduce mistakes.
Reduce repeated effort
Many tiring jobs are not difficult because of one heavy movement. They become difficult after the same movement happens dozens of times.
I try to improve the full process:
These changes may seem small. Together, they can make the job feel more manageable.
Choose control over raw strength
A powerful tool can still be a poor choice if it is hard to hold or adjust.
When I compare products, I check the grip, weight, balance, control settings, noise, battery or cable setup, and maintenance needs. A lighter tool may suit overhead work. A heavier tool may feel more stable on a fixed surface. Neither option fits every person or every task.
I also read the operating instructions and safety guidance. Protective equipment, correct settings, and a stable work position help reduce avoidable problems.
A practical example
A small furniture workshop in Manchester used to sand cabinet panels by hand. One worker could finish the work, but the repeated motion caused arm fatigue by the end of the day. The workshop changed the process by using a suitable powered sander, preparing the panels in batches, and checking the surface after each pass.
The powered tool did not remove the need for skill. The worker still had to choose the right abrasive, control the pressure, and inspect the result. The difference came from reducing unnecessary physical effort. The team spent less time repeating the same motion and more time checking quality.
That is the idea behind “More Power, Less Effort.” Power works best when it is paired with control and a clear process.
Use a simple buying checklist
Before I choose a product, I ask:
These questions keep the decision practical. They also help me avoid selecting a product based only on a high power rating.
More power can help me handle demanding work. Less effort comes from the whole setup: the right tool, the right setting, a clear workspace, and a method that avoids repeated strain.
When I focus on those details, I do not need to work harder just to make progress. I can use power with better control and leave more energy for the work that follows.

Every cut takes time. A slow setup, uneven pressure, or repeated measuring can turn a simple job into a long task.
I look for a cutting tool that helps me keep a steady rhythm from one piece to the next. The goal is not to rush the work. It is to reduce avoidable pauses while keeping the cut controlled.
A smoother cutting process usually starts with a stable setup.
This method helps me avoid common delays, such as stopping to correct a crooked cut or replacing a piece damaged by too much pressure.
A small workshop example makes the point. If I need to cut several lengths of trim, measuring each piece from the start can create small differences. Using a clear guide and checking the first piece before repeating the cut gives me a more consistent process. I spend less time correcting pieces later.
The tool also needs to match the material. Wood, plastic, metal, tile, and other surfaces may require different blades, discs, speeds, or safety steps. I check the product instructions before starting and replace worn cutting parts when the cut becomes rough or the tool needs extra force.
A faster process should still leave room for control.
I pause when:
These short checks can prevent a longer interruption. They also help protect the material, the tool, and the person using it.
For repeated work, I prepare the area before making the first cut. I keep the measuring tool, clamps, spare cutting parts, and cleaning brush within reach. This removes the small gaps between tasks that often add up across a full project.
I do not measure speed by how quickly the blade moves. I measure it by how smoothly I can complete the work with fewer corrections, fewer damaged pieces, and less wasted motion.
Set up with care. Use the right cutting part. Keep the material secure. Apply steady pressure. A clear process can help every cut feel more direct without sacrificing control.

Many cutting jobs begin with a simple problem: the material has become thicker, denser, or harder than the current machine can handle. The machine may still run, yet each cycle takes longer, the cut may need extra passes, and operators may spend more time adjusting pressure and alignment.
Upgrading to 40T cutting power gives the machine a higher force range for suitable materials and applications. The right result depends on the material, die design, stroke setting, machine structure, and operating method.
A 40T configuration provides up to 40 tons of rated cutting force, subject to the machine’s design and working conditions.
It can be considered for:
The cutting force does not work alone. A sharp die, stable material placement, and correct pressure settings also affect the finished edge.
I usually look at three production signs before recommending a higher-force setup.
The current machine needs several cuts for one part. This can increase cycle time and create small differences between pieces.
The material shows incomplete cuts around corners or dense areas. Operators may press harder or adjust the cutting height, but those changes can affect die life and material quality.
The production plan includes thicker materials. A machine that works well with thin sheets may not provide enough force for a new material range.
A 40T upgrade can help create more working capacity, but it should match the machine frame, hydraulic system, table size, and die dimensions.
A workshop producing rubber sealing parts may cut one layer without trouble. When the material becomes thicker, the outer edge can cut cleanly while the center remains attached. The operator then repeats the cycle or removes the unfinished section by hand.
With a suitable 40T setup, the workshop can test a stronger single-cycle cut. The result still depends on the rubber hardness, sheet thickness, die sharpness, and pressure setting. A small sample run should be completed before changing the full production process.
I recommend preparing these details:
Ask the supplier to confirm the rated force, usable cutting area, pressure range, stroke length, and maintenance requirements. A clear specification sheet makes comparison easier.
More cutting force is not a replacement for correct tooling. A worn die can leave rough edges even when the machine has enough power. Excess pressure can also shorten die life or damage softer materials.
I prefer to match the 40T capacity with the actual job instead of selecting force by number alone. Share a material sample, drawing, thickness range, and target output with the machine provider. This allows the setup to be checked before production begins.
A 40T cutting option can give a workshop more room to handle demanding materials and thicker stacks. The best choice comes from matching force, tooling, machine structure, and production needs.
Contact us today to learn more Hu: dgliheng168@163.com/WhatsApp +8613509684273.
International Organization for Standardization 2010 Safety of machinery General principles for design Risk assessment and risk reduction
Occupational Safety and Health Administration 2023 Machine guarding Safety requirements for operating cutting equipment
Erik Oberg Franklin D Jones Holbrook L Hort Charles J McCauley 2016 Machinery’s Handbook Tool selection cutting methods and production practices
Society of Manufacturing Engineers 2018 Manufacturing Processes for Engineering Materials Cutting tools materials and process optimization
American Society of Mechanical Engineers 2020 Safety Standards for Mechanical Power Presses Press operation and safeguarding practices
Robert H Todd Dell K Allen Leo Alting 2019 Manufacturing Processes Reference Guide Cutting speed feed rate and tool maintenance
Meet 40T, a fast, precise, and reliable solution built to perform when it matters most. Designed for consistent operation and dependable results, 40T combines speed, accuracy, and stability to help
Upgrade Your Shop with 40T Power and experience dependable performance built for demanding work. Designed to deliver impressive strength, consistent results, and reliable operation, 40T technology
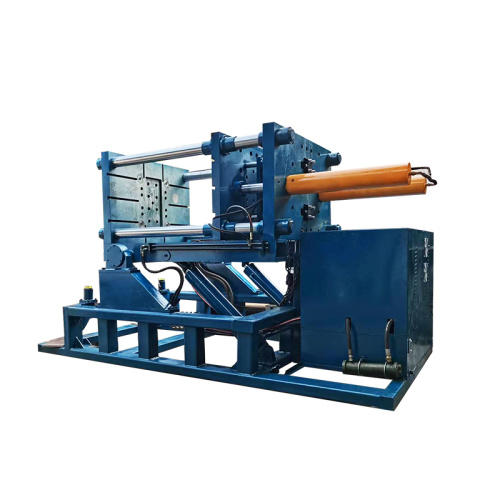
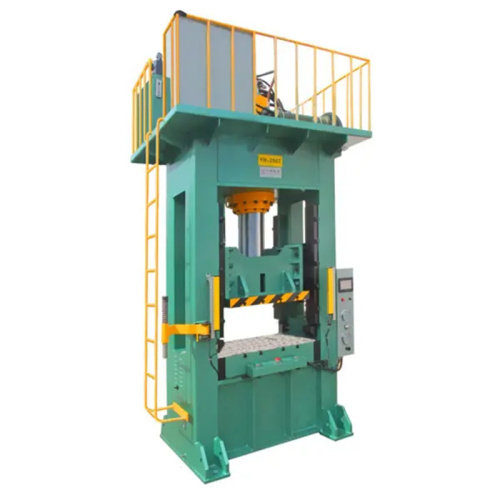
The 40T Hydraulic Press is built for demanding industrial pressing applications, delivering powerful force, dependable operation, and precise control. Its robust construction supports consistent pe
Say goodbye to frustrating jams and experience smoother, more reliable performance with 40T. Designed to help keep operations running efficiently, 40T delivers dependable results when you need them
Email to this supplier

September 22, 2026

September 21, 2026
Contact

Send Inquiry
PRODUCT CATEGORIES
Privacy statement: Your privacy is very important to Us. Our company promises not to disclose your personal information to any external company with out your explicit permission.
Fill in more information so that we can get in touch with you faster
Privacy statement: Your privacy is very important to Us. Our company promises not to disclose your personal information to any external company with out your explicit permission.