

Send Message
Privacy statement: Your privacy is very important to Us. Our company promises not to disclose your personal information to any external company with out your explicit permission.

Don’t Settle for Slow Cuts! Upgrade to fast, precise cutting performance that keeps every project moving forward. With efficient operation, reliable accuracy, and smooth results, the right cutting solution helps reduce downtime, improve productivity, and maintain consistent quality from start to finish. Work faster, cut cleaner, and stay ahead of demanding schedules with performance designed to keep up.


Slow cutting rarely comes from one weak component. The cause may sit in the blade, feed rate, material setup, coolant flow, or machine condition. When these details are not checked together, I often see operators push the machine harder, create more heat, and still get poor output.
A better approach starts with the cutting process itself.
I begin with the tool because wear changes the whole operation.
A dull blade or worn insert creates more friction. The cut takes longer, the surface may become rough, and the machine needs more force to remove the material. On metal, excess heat can also affect tool life and cut quality.
Look for signs such as:
The right tool must match the material. A blade for mild steel may not suit stainless steel, aluminum, wood, or composite material. Tooth count, tooth shape, rake angle, diameter, and coating can all affect the result.
I do not treat a higher tooth count as an automatic solution. Fine teeth can improve the finish, but they may also slow material removal or clog when the setup is not suitable.
A slow cut does not always mean the feed rate is too low. The machine may be using a feed setting that does not match the tool or material.
If the feed is too low, the tool may rub instead of cut. This creates heat without removing enough material. If the feed is too high, the tool may chip, deflect, or leave a poor edge.
I adjust the setting in small steps and watch three points:
A stable cut usually sounds consistent. Sudden changes in noise can point to vibration, uneven material, tool wear, or poor clamping.
Cutting speed affects heat, tool life, and production time.
A speed that works well for aluminum may be unsuitable for stainless steel. A hard material can require a different surface speed and a more controlled feed. The tool maker’s cutting data gives me a useful starting point, but I still check the actual setup before making a large adjustment.
For a circular saw, surface speed can be estimated with:
Surface speed = π × tool diameter × RPM
The units must stay consistent during the calculation. A small change in RPM can create a large change in cutting speed when the tool diameter is large.
I avoid making several adjustments at once. If I change RPM, feed rate, blade type, and coolant flow at the same time, it becomes hard to know which change helped.
A secure workpiece helps the tool stay on its intended path.
Poor support can cause vibration, movement, or deflection. The operator may respond by reducing the feed rate, yet the cut remains slow because the machine is working against an unstable setup.
I check whether:
A fabrication shop cutting long steel tube may see slow cuts when the free end is unsupported. The blade enters smoothly, then vibration starts near the exit. Adding support can improve the cut without adding machine power.
Heat and chips can limit cutting performance.
When chips remain in the cut, they can rub against the tool and workpiece. This may damage the edge and reduce cutting speed. Coolant can help control heat, but only when the flow reaches the cutting zone.
I check the nozzle position rather than assuming the pump is working well. A strong flow aimed at the wrong location may do little. For dry cutting applications, chip clearance and ventilation need closer attention.
The right fluid also depends on the material and tool. Some operations need cutting oil, some use water-mix coolant, and some are designed to run dry. Product instructions should guide the choice.
A performance issue may come from the machine rather than the cutting tool.
Common checks include:
For example, a band saw with poor blade tension may drift during the cut. Reducing the feed can make the problem less visible, but it does not correct the cause. Proper tension, alignment, and guide adjustment may produce a better result than simply changing the speed.
I prefer a simple cutting record over guesswork.
A useful log can include:
This record helps identify patterns. If cutting time rises after a certain number of parts, the tool may be reaching the end of its useful life. If only one material size causes trouble, support or clamping may be the main issue.
A small workshop can start with a paper sheet or a basic spreadsheet. The purpose is not to create extra paperwork. It is to connect machine settings with actual results.
When my cutting process feels slow, I use this order:
This method keeps the process easier to understand and reduces unnecessary tool changes.
Better cutting performance does not always require a larger machine or a more powerful motor. A suitable tool, stable workholding, correct settings, and regular inspection can make a clear difference. When I treat the cutting process as a complete system, slow performance becomes easier to diagnose and the next adjustment becomes more reliable.

Every cutting job looks simple until small delays begin to add up.
I measure the same piece twice. I search for the right blade. I stop because the material is not secured. A few minutes disappear at each step, and the whole job takes much longer than planned.
Working faster does not mean rushing. It means removing avoidable pauses, keeping the process safe, and making each cut with a clear plan.
Before I touch the tool, I check the material.
I look for:
This small check can prevent wasted pieces. A warped board, loose pipe, or damaged sheet may shift during cutting and create an uneven result.
I also mark the usable area. When several pieces come from one sheet, I place the marks close together without forcing the layout. A good cutting plan can reduce waste and make the next steps easier.
Many cutting errors begin with unclear marks.
I use a sharp pencil, marker, or scribe that matches the material. Thin lines help me see the exact cutting point. Wide or faded marks can create confusion, especially when several lines are close together.
For repeated pieces, I create a simple guide or stop block. This helps keep each measurement consistent. It also reduces the need to measure every piece from the beginning.
A small sign workshop can use this method when preparing several acrylic panels. Instead of measuring every panel by hand, the operator sets a fixed guide, checks the guide against the drawing, and cuts each panel from the same reference point. The work becomes easier to check, and small differences are less likely to spread across the batch.
A suitable blade or cutting disc affects both speed and finish.
Before starting, I check:
A worn blade may move slowly, heat the material, or create rough edges. Pushing harder does not always solve the problem. It may place extra pressure on the tool and the material.
The right setup often saves more time than extra force.
I do not rely on one hand to hold a piece in place while cutting. The material needs proper support.
Clamps, a workbench, or a stable cutting guide can reduce movement. Long pieces need support near the cutting area and along the part that may fall away. Without support, the material can pinch the blade or change direction near the end of the cut.
I leave enough room for the blade to pass through without touching the table or another object. I also keep my hands outside the cutting path and use the safety equipment recommended for the tool and material.
A steady workpiece allows the tool to do its job. It also gives me better control when the cut reaches the final few centimeters.
A clear sequence helps me keep the work moving.
This process prevents a common mistake: cutting every piece before checking whether the first one fits.
When I work on a custom shelf, I cut one side panel and test its dimensions before preparing the second panel. If the drawing contains a small change, I can adjust the setup before using the rest of the material.
Fast work is not the same as fast movement.
I guide the tool at a steady pace and avoid pushing it through the material. The correct speed depends on the tool, blade, and material. If the motor slows, the blade binds, or the cut becomes rough, I stop and check the setup.
Short pauses can protect the material and the tool. They also help me notice heat, dust, vibration, or unusual sounds before a small issue becomes a larger one.
For powered equipment, I follow the manufacturer’s instructions and use the required protective equipment. For dusty materials, suitable ventilation and respiratory protection may be needed. A clean work area makes it easier to see the mark and handle the piece safely.
Time is often lost between cuts, not during the cut itself.
I place the material, measuring tools, clamps, labels, and waste container within easy reach. Finished pieces go in one area. Uncut material stays in another. This layout reduces unnecessary walking and keeps the work area easier to inspect.
I also prepare labels before cutting a group of parts. Each label can include the part name, size, and quantity. This simple step helps prevent mix-ups when several pieces look similar.
A quick check after each key stage can prevent a larger repair later.
I inspect:
A small square, tape measure, or template is often enough for a basic check. More precise work may need a caliper or another suitable measuring tool.
I prefer checking the first piece from a batch before cutting the rest. This creates a useful control point without slowing down every single cut.
When I repeat a job, I write down the settings that worked.
The note may include:
The record does not need to be long. A few clear lines can help me prepare the same job later without starting from zero.
It also shows where time is being lost. If setup takes longer than cutting, the next improvement should focus on layout, tool access, or measurement. If rough edges appear often, the blade and cutting pace may need attention.
The best cutting process is not built around rushing. It comes from planning the material, preparing the tool, securing the workpiece, and checking the result at the right points.
I work faster when I remove repeated decisions from the process. I work smarter when I protect accuracy and safety while doing it. That balance helps each cut become more predictable, with less waste and fewer corrections.

A job can change from one hour to the next. I may start by drilling a few holes, move on to cutting material, then finish with sanding or fastening. When my tools lack steady power, the work slows down, batteries need frequent charging, and small delays begin to affect the whole project.
That is why I look for a power setup that fits the job, not one designed for only a single task.
The right choice starts with the work itself.
A home repair project may need enough power for a drill, light, or small saw. A workshop may require longer operating time and support for several tools. Outdoor work can bring another concern: access to outlets. A suitable power source should match the tools, working space, and length of each task.
Before choosing equipment, I check these points:
Power output is only one part of the decision. A tool may start with a short burst of higher power, then use less power during normal operation. I check both starting demand and running demand before connecting equipment. This simple habit helps reduce overload problems and gives me a clearer view of what the setup can handle.
Portability also affects the way I work.
A compact unit can be useful for small repairs, service calls, and rooms without a nearby outlet. A larger unit may support longer tasks, but it can take more effort to carry and store. I prefer a setup that I can move without changing my work area every few minutes.
Noise matters as well. In a home, school, office, or shared work area, loud equipment can make communication difficult. A quieter power source may help me focus and keep the space more comfortable. The best option depends on the tool load, location, and operating conditions.
I also pay attention to the connection points. Different jobs may call for standard outlets, USB ports, extension connections, or direct tool charging. Having the right ports reduces the need for extra adapters. It also keeps the work area more organized.
A simple example is a kitchen cabinet repair.
I may use a drill for installation, a small light inside the cabinet, and a sander for surface preparation. These tools do not need to run at the same time. I can plan the order of the work, connect one tool when needed, and monitor the available power. This approach keeps the setup manageable and avoids adding equipment that the job does not require.
For outdoor maintenance, the needs may change. A cordless trimmer, work light, or small pump can be useful around a garden or property. I check weather conditions, keep electrical connections away from water, and place the power source on a stable, dry surface. Safe placement is part of good preparation.
Before each job, I use a short checklist:
Maintenance can affect daily performance. Dust may collect around vents. Cables can wear when they are bent or pulled. Batteries may lose capacity when stored in unsuitable conditions. I clean the equipment according to the manufacturer’s instructions and replace damaged parts rather than continuing to use them.
Good planning also saves energy. I avoid leaving tools running between tasks, choose the correct tool for the material, and charge batteries before starting longer work. A steady routine helps me spend more time on the job and less time solving avoidable power problems.
Powering every job does not mean using the largest system available. It means understanding the work, checking the load, and choosing equipment that supports the way I actually work. When the power source, tools, and workspace fit together, drilling, cutting, lighting, and repairs become easier to manage.

When a video feels slow, viewers often leave before the main idea arrives. Long pauses, repeated points, and delayed visuals can hide useful information. I have seen this happen with product demos, interviews, training clips, and short social videos.
Fast cuts can help, but speed alone does not create a better video. The goal is to remove what blocks the message while keeping the parts that build trust, context, and emotion.
I start by identifying the main action in each scene. If a speaker explains how to use a coffee machine, I keep the hand movement, the key instruction, and the finished result. I remove empty pauses, repeated phrases, and moments where the camera stays still without adding meaning.
A simple editing process can make the work easier:
1. Mark the useful moments
I watch the full recording before cutting. I note the strongest statements, clear demonstrations, and natural reactions. This gives me a map of the video before I shorten it.
2. Remove silence with care
A short pause can make speech feel natural. A long pause can make the viewer question whether the video has stopped. I trim quiet sections while leaving enough space for the words to sound comfortable.
3. Cut on movement
Cuts often feel smoother when they happen during an action. A hand reaching for a tool, a person turning toward the camera, or a product moving across the frame can hide the transition. This keeps the pace active without making the video feel rushed.
4. Match the cut to the message
A new visual should support the words. When a presenter says, “The filter slides out from the side,” I show the filter at that moment. The viewer can hear the instruction and see the action at the same time.
5. Keep the opening focused
Many viewers decide whether to continue within the first few seconds. I place the clearest problem, result, or useful idea near the beginning. A long logo animation or a general introduction can wait, or it can be removed when it does not help the viewer.
6. Check the rhythm with sound off
Visual pacing becomes easier to judge when the audio is muted. I look for frozen shots, awkward jumps, and repeated angles. After that, I review the cut with sound to check whether the dialogue still feels natural.
I once edited a short tutorial for a small home bakery. The original video lasted nearly six minutes and included several pauses while the baker searched for tools. The useful method took less than three minutes to explain. After cutting the pauses and showing each tool at the moment it was mentioned, the video became easier to follow without changing the recipe or making claims about the product.
Fast cuts work best when every edit has a reason. A short video should not feel empty, and a detailed video should not feel heavy. I aim for a pace that respects the viewer’s time while giving each idea enough room to land.
Good editing is not about cutting the most footage. It is about keeping the right footage. When the message stays clear, the visuals support the words, and the rhythm matches the subject, a shorter video can create a stronger viewing experience.
We welcome your inquiries: dgliheng168@163.com/WhatsApp +8613509684273.
OSHA 2023 Machine Guarding and Safe Cutting Practices
Sandvik Coromant 2022 Metal Cutting Technology and Tool Selection
Erik Oberg Franklin D Jones Holbrook L Horton and Henry H Ryffel 2020 Machinerys Handbook
ISO 2019 Machine Tools Safety Requirements for Sawing Machines
Adobe 2023 Essential Video Editing Techniques for Clearer Content
U.S. Department of Energy 2022 Portable Power Equipment Safety and Energy Management
Meet 40T, a fast, precise, and reliable solution built to perform when it matters most. Designed for consistent operation and dependable results, 40T combines speed, accuracy, and stability to help
Upgrade Your Shop with 40T Power and experience dependable performance built for demanding work. Designed to deliver impressive strength, consistent results, and reliable operation, 40T technology
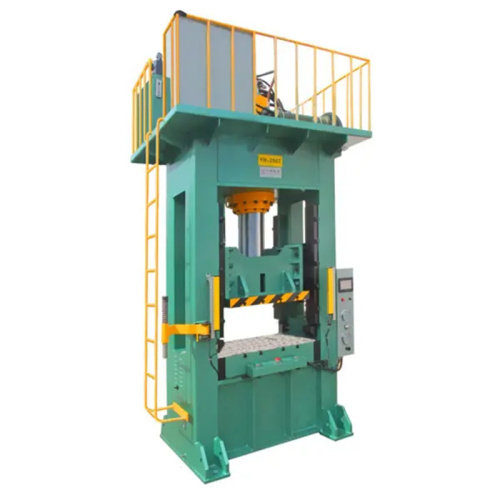
The 40T Hydraulic Press is built for demanding industrial pressing applications, delivering powerful force, dependable operation, and precise control. Its robust construction supports consistent pe
Say goodbye to frustrating jams and experience smoother, more reliable performance with 40T. Designed to help keep operations running efficiently, 40T delivers dependable results when you need them
Email to this supplier

September 22, 2026

September 21, 2026
Contact

Send Inquiry
PRODUCT CATEGORIES
Privacy statement: Your privacy is very important to Us. Our company promises not to disclose your personal information to any external company with out your explicit permission.
Fill in more information so that we can get in touch with you faster
Privacy statement: Your privacy is very important to Us. Our company promises not to disclose your personal information to any external company with out your explicit permission.