

Send Message
Privacy statement: Your privacy is very important to Us. Our company promises not to disclose your personal information to any external company with out your explicit permission.

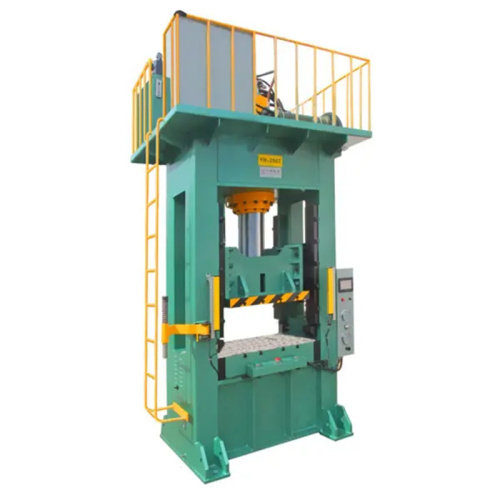
Stop wasting time with slow, inefficient equipment—upgrade to the powerful 40T Press and take your production to the next level. Designed for demanding operations, it delivers strong pressing force, faster cycle times, and dependable performance to help improve productivity and reduce downtime. Whether you work in manufacturing, fabrication, or industrial processing, the 40T Press provides the efficiency, consistency, and reliability your business needs to get more done in less time. Upgrade today and experience a smarter, more powerful pressing solution.


A low-capacity press can slow down a production line in ways that are easy to overlook. Operators may need more passes, lighter settings, or extra handling to complete one part. The result can be longer cycle times, uneven forming, and more pressure on the machine.
I have seen this issue in small metalworking shops that use a press below the needs of their daily jobs. A bracket that should take one clean stroke may require several adjustments. That adds labor and makes output harder to plan.
A 40T press can be a practical option for shops that need more forming force while keeping the machine size within a manageable range. The right choice depends on material, part shape, tooling, stroke length, and working speed.
I start with the parts, not the machine name.
Review these points:
A 40-ton rating does not mean every job will run at the same force. The actual load changes with the material and the forming method. Deep drawing, bending, punching, and pressing operations place different demands on the machine.
For example, a shop forming mild steel brackets may need a different setup from a shop working with aluminum covers. The tonnage may be similar, while the die, stroke, speed, and work table requirements can vary.
The force rating is only one part of the selection process.
I recommend checking:
A machine with enough force but too little daylight may not fit the die. A press with a suitable table may still be difficult to use if the stroke does not match the part.
The working area also affects setup time. When the die can be aligned and secured without repeated adjustments, operators can spend less time preparing each job.
A press should not operate close to its rated limit for every cycle.
When I review a press application, I look for a suitable working range rather than choosing a machine based only on the largest force mentioned in a job list. A reasonable margin can help reduce strain on the frame, hydraulic system, tooling, and related components.
The required force may be affected by:
A production team should confirm the force calculation with the tooling supplier or machine manufacturer. This helps avoid selecting a press that is too small for the job or much larger than the actual need.
An efficient press is not only about force. It also needs to support a clear and repeatable workflow.
I pay attention to:
If an operator has to reach around the tooling or make repeated manual adjustments, the production process may remain slow after the machine upgrade.
A simple work sequence often works well:
The exact process should follow the machine manual and the shop’s safety procedures.
A 40T hydraulic press may require changes to the workshop setup.
Before installation, I check:
The machine should sit on a stable surface with enough space for operators and service personnel. The electrical connection should be completed by a qualified technician.
A press that fits the production plan but does not fit the workshop can create new delays during installation and service.
A trial run can answer questions that a specification sheet cannot.
Prepare one or more common parts and review:
For example, a sheet metal shop may test a bracket that is produced every day. The team can compare the number of strokes, adjustment needs, and inspection results with the current press.
This gives the buyer a clearer basis for comparing machines. It also helps identify tooling changes before the new equipment reaches the production floor.
Some shops buy a larger press when the real problem is elsewhere.
The delay may come from:
I prefer to map the complete process before choosing equipment. If the press is waiting for material, more force will not solve the delay. If operators spend most of the shift changing dies, a faster setup method may bring more value than a higher press rating.
A 40T press makes more sense when the forming operation itself is limiting output or when the current machine lacks enough force for the required parts.
A press works better when routine care is part of the production plan.
The maintenance checklist may include:
Operators should record changes in pressure, speed, and part quality. A small change in forming behavior may point to tool wear, oil issues, or an alignment problem.
The service schedule should come from the manufacturer’s instructions and the actual working conditions of the shop.
A small fabrication shop produces steel mounting plates in several sizes. Its existing press handles the lighter plate, but thicker material needs extra strokes and frequent setting changes. Operators spend more time repositioning parts, and inspection finds occasional differences in bend depth.
The shop reviews the material range, die width, stroke requirement, and daily batch size. It tests a 40T hydraulic press with the main die. The trial shows that the thicker plate can be formed in one controlled cycle, while the lighter plate still runs at a lower setting.
The result is not only related to the higher force. The larger working area, better die support, and easier adjustment also reduce handling steps. The shop then updates its work instructions and keeps the original press for lighter jobs.
A 40T press may suit a workshop that needs more forming capacity without moving to a much larger machine. It can support bending, pressing, punching, and other operations when the tooling and material requirements match the machine.
The best purchase starts with a clear list of current jobs. Compare that list with the press specifications, test a representative part, review the installation conditions, and confirm safety requirements before placing an order.
A machine upgrade should remove a real production limit. When the press, tooling, operator workflow, and maintenance plan work together, the shop can gain a steadier process instead of adding another piece of equipment that creates new adjustment work.

When production slows down, the problem is not always a lack of staff. A small forming error, repeated setup work, or a press that cannot handle the required load can affect the whole workflow.
A 40T press gives me more working capacity for jobs that need controlled force. It can support tasks such as bending, forming, straightening, pressing bearings, and fitting parts, depending on the machine design, tooling, and material being processed.
I do not choose a press by tonnage alone. The working stroke, table size, daylight, speed, control system, and safety features also affect daily performance.
A 40-ton press can suit workshops that handle light to medium forming work. It may be used for:
The right application depends on the material thickness, part shape, required force, and tooling setup. A press rated at 40 tons does not mean every job should run at its maximum load.
I often see production delays caused by repeated adjustments rather than the pressing operation itself. A practical work area can reduce this issue.
Useful features may include:
When operators can position the workpiece with less handling, the process becomes easier to repeat. This helps reduce unnecessary movement between operations.
Manual force can vary from one operator to another. A hydraulic 40T press can provide a more controlled pressing process when pressure and stroke settings are adjusted correctly.
For example, a repair shop may use the press to remove and install bushings. The operator can support the component, align the tooling, and apply force in a controlled way. Good alignment matters as much as the press capacity. If the tool is off-center, the part and machine may both be placed under extra stress.
I treat the rated force as a working limit, not a target for every cycle. The material, tool shape, contact area, and pressing direction all affect the actual load.
I use a simple process when preparing a job:
1. Check the material
Identify the material type, thickness, hardness, and shape. A steel part and an aluminum part may need different pressure and support methods.
2. Measure the workpiece
Check the part size against the table, opening, stroke, and available working space. This avoids problems after the tooling has been installed.
3. Select suitable tooling
Use dies, plates, punches, or supports that match the job. Improvised tooling can cause uneven pressure and damage the workpiece.
4. Set the pressing position
Place the load near the center of the working area when the machine design requires it. Keep the workpiece stable before pressure is applied.
5. Test with a low-force cycle
A test cycle can reveal alignment issues before the full operation begins. I prefer correcting the setup early rather than repairing a damaged part later.
6. Record useful settings
For repeat jobs, note the tooling arrangement, working height, pressure range, and stroke position. This gives the next operator a clear reference.
A small repair workshop may handle shafts, bushings, and brackets in the same work area. The team may not need a large production press, but a hand-operated tool can make heavier jobs slow and difficult.
A 40T hydraulic press can give the workshop more room to manage these tasks. One job may require moderate force to remove a seized bushing. Another may involve straightening a bracket with careful support. The press does not remove the need for skilled setup, but it can make the force easier to control.
The result depends on the machine, tooling, operator training, and maintenance routine. A press should support the process, not replace basic inspection and safe working methods.
A press operates under high force, so the work area needs clear operating rules. Operators should receive training and use the guards and protective equipment specified by the manufacturer.
I also check:
The machine should be inspected before use, especially when the job involves a new die or an unfamiliar part. Damaged tools, unstable loads, and off-center pressing can create avoidable risks.
Before placing an order, I compare the machine specifications with the work I actually handle.
Key questions include:
A 40T press can be a practical choice for workshops that need more force and control without moving to a much larger machine. Its value comes from matching the equipment to the work, setting up each job carefully, and keeping the press in good condition.
When the machine, tooling, and workflow work together, I spend less time correcting preventable problems and more time completing the actual job.

When my workshop handles repeated bending, punching, or forming jobs, production time can disappear between setup changes, manual adjustments, and material handling. A 40T press can help bring more control to these tasks when its capacity, working area, and tooling match the job.
The key point is simple: press capacity should fit the material and process. A 40-ton rating does not mean every material can be formed at the same size or thickness. The actual result depends on the material type, die design, stroke, working width, and machine settings.
I start by checking the job requirements.
This check helps me avoid choosing a press based only on its tonnage.
A 40T press may suit small and medium forming tasks such as sheet metal bending, light punching, straightening, and basic workshop fabrication. The suitable range depends on the machine design and the tooling used. A supplier should provide the technical data before I make a purchase decision.
I also review the press structure. A stable frame can help reduce movement during operation. A clear control panel can make daily adjustments easier for operators. Adjustable stroke and pressure settings may support different jobs, but these functions vary by model.
For a workshop that produces several small metal parts, the setup process often affects the working schedule. I can reduce unnecessary delays by preparing dies, checking the material size, and recording common settings for repeat jobs. The press itself is only part of the solution. Good preparation has a direct effect on output.
A practical example is a small fabrication shop making brackets in several sizes. The operator may use one die for a short bracket and another die for a wider part. If each change requires repeated measuring and testing, the machine may sit idle. A clear setup sheet, labeled tooling, and a suitable 40T press can make the changeover more orderly. The actual time saved will depend on the machine, operator skill, material, and production method.
Safety needs attention at every stage. I check that the emergency stop works, the guarding is in place, and the operating area is free from loose tools. Operators should receive training for the specific press model. Hands should stay away from the forming area, and the machine should be inspected before use. A press should never be used beyond its rated capacity.
Maintenance also supports steady operation. I inspect hydraulic lines, electrical connections, fasteners, tooling, and lubrication points according to the supplier’s instructions. Unusual noise, pressure loss, oil leakage, or uneven movement should be checked before the machine continues working.
When I compare 40T presses, I look beyond the capacity label. I review:
These details help me judge whether the press fits the work I actually do.
A 40T press can be a practical option for workshops that need repeatable forming force without choosing a larger machine than the job requires. The right choice comes from matching the press to the material, part size, tooling, workload, and safety plan.
Before ordering, I prepare sample drawings or part dimensions and ask the supplier to confirm the required force and machine range. This small step can reduce the risk of selecting equipment that does not fit the production task.
When I press clothes for work, one small mistake can cost time, fabric, and customer trust. Too much heat may leave a shine on dark material. Too little pressure may leave wrinkles behind. A rushed setup can also lead to uneven results.
I have found that garment pressing becomes easier when I treat it as a simple process rather than a race. The right temperature, a clean pressing surface, and a steady working order can make a clear difference.
I check the care label before turning on the iron or heat press. Cotton, linen, polyester, wool, and blended fabrics each respond to heat in different ways.
I look for:
If the label is missing, I test a hidden area with low heat. A small test near a seam can help me avoid damaging the visible part of the garment.
A clean work area helps me keep my attention on the garment. I remove loose threads, dust, paper scraps, and anything that may leave a mark.
I also check the pressing surface. It should be firm, flat, and covered with a clean heat-safe pad. A soft surface may make seams look uneven. A dirty cover may transfer marks to light fabric.
I keep these items close:
Good preparation reduces repeated movement. It also helps me notice problems before they reach the customer.
The temperature should match the fabric, not the speed of the job. I start with a lower setting and raise it only when needed.
For a manual iron, I use smooth movement and light pressure on delicate fabric. For a heat press, I follow the material supplier’s instructions for temperature, pressure, and pressing time. These settings can vary between cotton shirts, transfer film, patches, and coated materials.
A simple test can guide me:
I never leave a heated tool face down on the fabric. When I step away, I switch it off or place it on its safe stand.
Dragging an iron across fabric may stretch the garment or move its shape. I often lift and place the iron in small sections. This method takes a little more attention, yet it gives me better control around collars, seams, and printed areas.
For shirts, I use this order:
I press the collar from the underside when the fabric allows it. I place sleeves flat and align the seams before applying heat. This helps prevent a sharp crease in the wrong position.
When I work on a printed shirt, I turn it inside out or cover the design with a pressing cloth. Direct heat may affect the print, adhesive, or surface texture.
Silk, wool, velvet, and some synthetic fabrics need extra care. I use a pressing cloth and avoid holding heat in one place for too long.
For velvet and raised fabrics, I try to press from the reverse side. A towel or needle board can support the surface without crushing the texture. I avoid spraying water directly onto fabric that may show water marks.
Dark garments can develop a shiny patch when pressure and heat are too high. Pressing from the inside and using a cloth can reduce this risk.
When I apply a heat transfer, I make sure the garment is smooth, dry, and free from lint. I pre-press the fabric for a short time when the material instructions allow it. This can remove light moisture and small wrinkles.
I place the design carefully and check its position before closing the heat press. A ruler or alignment guide helps me keep the design level.
After pressing, I follow the transfer supplier’s instructions for peeling. Some films require a warm peel, while others need to cool first. I do not guess, because the wrong peeling method can lift parts of the design.
A small sample test helps me check:
A local clothing seller I worked with once prepared ten sample shirts before accepting a larger order. The test showed that one fabric blend needed lower heat. That simple check helped avoid damage across the full batch.
My results become more consistent when I use the same order for each job. I record settings that work for common materials and label them clearly.
A basic work note may include:
This record helps when the same customer returns with a similar item. It also makes training easier if another person joins the work.
I inspect every item under normal light before packing it. I check for wrinkles, marks, loose edges, uneven transfers, and unwanted creases. If I find a problem, I correct it before the garment leaves the workspace.
A freshly pressed garment may need time to cool and settle. I place it on a hanger or lay it flat, depending on the material. I avoid folding warm transfers because the surface may stick or form a crease.
For garments with heat-applied designs, I give the customer simple care guidance:
Clear care instructions can reduce confusion after delivery. They also show that the pressing process includes more than the few minutes spent under heat.
Pressing with confidence comes from control, not speed. I check the fabric, prepare the workspace, use suitable settings, and inspect the result before moving on. A steady process protects the garment and helps me produce work that looks clean, balanced, and ready to wear.

When a workshop handles bent brackets, bushings, bearings, or stubborn metal parts, a light-duty press can slow the job down. The operator may need extra setup, repeated attempts, or another machine for work that should fit into one process.
A 40-ton hydraulic press gives me a stronger working range for pressing, straightening, forming, and removing fitted parts. It is built for tasks that need steady force rather than quick impact.
The key point is not the tonnage alone. I also need to check the frame, cylinder travel, working width, bed adjustment, pressure control, and safety features before choosing a press.
A 40T Press for Common Workshop Tasks
I can use a 40-ton press for jobs such as:
The correct use depends on the material, part size, tooling, and pressure required. A press should never be selected from tonnage alone.
What I Check Before Buying
The frame carries the load during pressing. I look for a stable structure with properly supported uprights and a working bed that can hold the part without shifting.
A rigid frame helps keep the pressing force aligned. Poor alignment can place stress on the machine, the tooling, and the workpiece.
The space between the uprights affects the parts I can position. I measure the width and height of my usual jobs before making a decision.
For example, a repair shop working on vehicle hubs may need less width than a fabrication shop handling long brackets. The right working area depends on the parts already found on my workbench.
Cylinder stroke controls how far the ram can move. A longer stroke may reduce the need for repeated repositioning, while a shorter stroke can suit compact work.
I compare the cylinder travel with the height of the parts and the tools I plan to use. This simple check can prevent problems after installation.
An adjustable bed lets me change the working height for different jobs. I can place smaller parts closer to the ram and create more room for taller assemblies.
The bed should be secure at each position. I do not place loose blocks or unstable supports under a loaded part.
A pressure gauge helps me monitor the force during operation. Controlled pressure is useful when a part requires a gradual load instead of the full capacity of the machine.
I start with the lowest suitable force and increase it only when the setup remains stable. This approach helps reduce damage to parts and tooling.
A Practical Workshop Example
Imagine a small equipment repair shop working on a seized bearing. The technician removes the assembly from the machine, places it on a suitable support, and checks that the force will travel through the bearing and housing in a straight line.
The 40-ton capacity provides room for jobs that need more force than a small bench press can supply. The technician still selects the correct adapters, checks the part for cracks, keeps hands away from the pressing area, and applies pressure in a controlled way.
The press does not replace correct preparation. It gives the operator a stronger tool for a wider range of repair work.
Safe Operation Matters
I keep the following points in my operating routine:
A hydraulic press stores force while it is under load. Careful setup matters as much as the rated capacity.
Matching the Press to the Job
A 40-ton press may fit a workshop that handles regular repair and fabrication work. It may be more than I need for small plastic parts or light assembly tasks. It may also be unsuitable for work that requires a larger opening, a longer stroke, special forming tools, or automated controls.
I compare the press with my normal workload:
These questions give me a more useful answer than a product label by itself.
Why a 40T Press Can Be a Practical Choice
For many repair and fabrication tasks, 40 tons offers a useful balance between working force and machine size. I can handle more demanding jobs without moving directly to a much larger press.
The machine can support daily work when the frame, hydraulic system, bed, and controls match the application. The result depends on correct setup, suitable tooling, and safe operation.
I do not treat the 40T rating as permission to press every part. I treat it as the upper capacity of a tool that must be used within its operating instructions.
Before choosing a 40T hydraulic press, I measure my parts, review the required force, inspect the working area, and confirm the safety features. That process helps me select a press that fits the workshop instead of choosing based on tonnage alone.
Want to learn more? Feel free to contact Hu: dgliheng168@163.com/WhatsApp +8613509684273.
Meet 40T, a fast, precise, and reliable solution built to perform when it matters most. Designed for consistent operation and dependable results, 40T combines speed, accuracy, and stability to help
Upgrade Your Shop with 40T Power and experience dependable performance built for demanding work. Designed to deliver impressive strength, consistent results, and reliable operation, 40T technology
The 40T Hydraulic Press is built for demanding industrial pressing applications, delivering powerful force, dependable operation, and precise control. Its robust construction supports consistent pe
Say goodbye to frustrating jams and experience smoother, more reliable performance with 40T. Designed to help keep operations running efficiently, 40T delivers dependable results when you need them
Email to this supplier

September 22, 2026

September 21, 2026
Contact

Send Inquiry
PRODUCT CATEGORIES
Privacy statement: Your privacy is very important to Us. Our company promises not to disclose your personal information to any external company with out your explicit permission.
Fill in more information so that we can get in touch with you faster
Privacy statement: Your privacy is very important to Us. Our company promises not to disclose your personal information to any external company with out your explicit permission.