

Send Message
Privacy statement: Your privacy is very important to Us. Our company promises not to disclose your personal information to any external company with out your explicit permission.

Experts favor 40T cutting technology because it combines precision, smooth operation, and dependable performance. Its optimized tooth density produces cleaner cuts while minimizing vibration, material waste, and rework. Suitable for a wide range of applications, this technology improves cutting efficiency and delivers professional-grade results with enhanced durability and consistent quality.

When I choose a cutting blade, I do not look at the tooth count alone. The material, thickness, machine speed, feed rate, and required edge quality all affect the result.
A 40T blade is often selected when I need a balance between cutting speed and surface finish. It can suit many jobs involving wood, sheet materials, plastic, and some non-ferrous metals, provided that the blade design matches the material and machine.
“40T” usually means the blade has 40 teeth. Tooth count affects how the blade enters and leaves the material.
A lower tooth count often removes material quickly and helps with faster cuts. A higher tooth count can leave a smoother edge, though it may need a slower feed rate.
A 40T blade sits between these two choices. It can provide a practical balance:
The result also depends on tooth shape, kerf width, rake angle, blade diameter, and the quality of the cutting machine.
I often see operators choose 40T when one blade needs to handle more than one routine task. They may cut boards during one part of the day and trim thinner panels later. A very coarse blade may leave too many rough fibers. A very fine blade may slow the job and produce more heat.
A 40T setup can help when the work calls for a reasonable surface finish without making every cut a slow operation.
For example, a small cabinet workshop may cut laminated panels, plywood, and solid wood parts on the same table saw. The operator needs clean edges for assembly, but the work also has a daily production schedule. A suitable 40T blade may fit this type of workflow better than a blade designed only for fast rough cuts or delicate finishing cuts.
This does not mean every 40T blade will produce the same result. Two blades with the same tooth count can behave differently because their tooth profiles and materials are not the same.
I check the material before I check the blade label.
For wood, I look at the grain, thickness, moisture, coating, and the type of edge required. Plywood and laminated panels may need a blade designed to reduce chipping. Solid wood may require a tooth shape that clears chips efficiently.
For plastic, I pay attention to heat. A blade that creates too much friction may soften the material and leave melted edges.
For aluminum and other non-ferrous metals, I use a blade made for that material. A general-purpose wood blade is not a safe replacement. The machine, blade speed, clamping method, and cutting fluid requirements also need attention.
I also check the saw’s manual. The blade diameter, bore size, rotation direction, maximum speed, and guard system must match the machine.
Even a suitable 40T blade can perform poorly when the setup is wrong.
I keep the material supported close to the cutting path. I set the blade height according to the machine instructions and secure the workpiece before cutting. A dull blade, loose guide, or incorrect feed rate can create burning, vibration, rough edges, and uneven cuts.
When the edge becomes rough, I do not assume that a higher tooth count will solve the problem. I inspect the blade condition, alignment, material support, and feed pressure. The cause may be the setup rather than the 40T design.
I use a small test piece from the same material as the main job. I make a cut at the planned machine settings and inspect:
If the edge is clean and the machine runs smoothly, the blade may be a good match. If the cut burns, stalls, or produces heavy chipping, I adjust the setup or choose a blade designed for that material.
My view is simple: 40T is useful because it can balance speed and finish in the right application. It is not a universal answer. The best choice comes from matching the tooth count with the material, machine, cutting method, and finish standard.

Many buyers see “40T cutting” and assume the machine can cut any material at any thickness. That is not how cutting force works.
A 40-ton machine can deliver strong pressure, but the result still depends on the material, die size, cutting area, blade condition, and machine setup. I always tell buyers to look beyond the tonnage number. The right question is not, “Is 40T enough?” It is, “Can 40T produce a clean cut for my product and production method?”
The “40T” label refers to the machine’s maximum cutting force. It does not describe the cutting speed, working area, or maximum material thickness.
A machine may produce a clean cut on a small die with a limited cutting area. The same machine may struggle when the die becomes larger or the material becomes harder.
Common materials used with this type of machine may include:
The actual result varies from one material to another. A soft foam sheet and a dense rubber sheet may have the same thickness but need different pressure and setup.
A small cutting die concentrates force over a smaller area. A large die spreads the force across a wider surface.
This is one reason a 40T machine may cut a small rubber gasket well but need more pressure or more cutting passes for a large dense sheet. The die shape also matters. Sharp corners, narrow sections, and long cutting lines can change the pressure needed.
When I help a customer choose a machine, I ask for these details:
These details give a better picture than tonnage alone.
Imagine a workshop that makes EVA pads for packaging. The material is light and soft, and the die is fairly small. A 40T machine may handle several layers in one cycle, depending on the pad shape and the target cut quality.
Now change the job to thick rubber seals. The material resists the blade more strongly, and the cut line may be longer. The workshop may need fewer layers per cycle, a sharper die, slower pressure movement, or a different cutting setup.
The machine rating has not changed. The production conditions have.
I use a simple review process before making a recommendation.
Material check
I ask for a sample or clear material data. Thickness alone does not show the full cutting demand. Density, hardness, stretch, and surface structure also affect the result.
Die check
The die size and shape help estimate how much force the machine must apply. A small die may need less force than a wide die made for the same material.
Layer check
Cutting one layer and cutting ten layers are different jobs. More layers may improve output, but they also increase resistance and can affect edge quality.
Quality check
Some products only need a separated shape. Other products need a clean edge with little compression or tearing. The required finish affects the choice of blade, pressure, and cutting pad.
Cycle check
A machine that cuts well in a test may not match a busy production line if the cycle is too slow. I look at loading, alignment, pressing, return movement, and unloading as one process.
Many cutting problems are blamed on the machine when the real issue is setup.
The cutting board should be flat and in suitable condition. A worn board can cause uneven pressure and incomplete cuts. The die should sit level, and the material should remain stable during pressing.
I also recommend checking:
A small alignment error can leave one part of the product cut while another part remains attached.
Maximum force is not always the best setting.
Too much pressure can shorten die life, damage the cutting board, compress soft materials, or leave marks on the product. It may also increase stress on the hydraulic system.
I prefer to begin with a lower setting, make a test cut, and raise the pressure step by step until the cut separates cleanly. This approach helps protect the machine and makes it easier to find a stable working point.
The best setting is the lowest pressure that meets the product requirement.
A useful supplier should ask questions about the job instead of giving only a tonnage number.
You can ask:
A cutting test is more useful when the supplier records the material, thickness, die size, layer count, pressure, and result. A short video without these details may not tell you much.
A 40T machine produces high force. Operators should receive clear training before using it.
The working area should stay free of hands, loose tools, and unstable material. Guards, two-hand controls, emergency stops, and limit switches should be checked during installation and routine service.
Operators should not try to hold a small piece near the die while the machine is pressing. A proper tool or positioning method is safer and more consistent.
Safety instructions should match the actual machine model and local workplace requirements.
I see 40T as a useful capacity for many small and medium cutting jobs, but it should not be treated as a universal answer. The machine works well when its force, working area, die, and material are matched correctly.
Buyers often focus on the largest number in the quotation. I pay more attention to the complete cutting process. A machine with suitable force, stable pressure control, a practical work area, and reliable safety features can be more useful than a machine with higher tonnage but poor job fit.
Before placing an order, prepare a material sample, the largest die drawing, the normal layer count, and the required output. A proper test can show whether the machine delivers clean cuts, acceptable cycle times, and repeatable results for your products.

A clean cut does not begin when the blade touches the material. It begins with the right tooth count.
When I work with wood panels, trim boards, or laminate sheets, I often look at the blade before changing the cutting speed. A 40-tooth blade can offer a useful balance between cutting smoothness and working pace, especially when the job needs a neater edge without making every pass too slow.
The result still depends on the material, saw, feed rate, and blade condition. Tooth count is one part of the cutting setup, not a promise of the same result in every workshop.
A blade with more teeth usually removes less material with each tooth. This can help reduce rough edges on many common wood-based materials.
A 40T blade may suit tasks such as:
When I use a blade with too few teeth for a finished cut, the edge may show larger tooth marks. When I choose a very high tooth count for a fast rip cut, the saw may need more effort and the cutting speed may drop.
The 40T option sits between these two needs. It can support a smoother cut while keeping a practical pace for many everyday jobs.
The same 40T blade will not behave the same way on every material.
For solid wood, I check the grain direction and board thickness. Crosscuts often benefit from a blade designed for cleaner end grain cuts. Long rip cuts may work better with a blade that has fewer teeth and larger gullets for chip removal.
For plywood and laminate panels, I pay closer attention to the cutting face. The surface layer can chip when the blade is dull, the feed rate is too fast, or the blade is not suited to the panel.
For coated boards, I also check the blade design. Tooth shape, hook angle, kerf width, and carbide quality can affect the edge more than the number printed on the package.
I use a simple check before cutting:
Confirm the blade size
The diameter, arbor hole, and saw capacity must match the machine. A tooth count alone does not confirm compatibility.
Inspect the blade
I look for resin buildup, damaged teeth, missing carbide, or signs of uneven wear. A dirty blade can create heat and rough edges.
Set the cutting depth
For many circular saw tasks, I avoid setting the blade much deeper than needed. A smaller amount of exposed tooth can help reduce unnecessary tear-out.
Support the material
The panel or board needs stable support on both sides of the cut. Movement during cutting can cause a rough line even when the blade is suitable.
Keep the feed rate steady
Pushing too quickly can increase chipping and motor load. Pushing too slowly can create heat and burn marks. I try to let the saw maintain a steady sound while the blade moves through the material.
Check the visible face
On some saw setups, the teeth enter or leave the material in different directions. I place the finished face based on the tool and cutting method, since tear-out often appears where the teeth exit.
Imagine cutting a melamine-coated shelf panel for a cabinet.
A coarse blade may complete the cut quickly, but the front edge can show small chips. A 40T blade may produce a cleaner edge when the panel is supported well and the feed rate stays controlled. If the coating still chips, I would check the blade direction, fence alignment, blade sharpness, and panel support before assuming that more teeth are needed.
A scoring blade, track saw setup, or fine-finish blade may be a better choice for some coated panels. The right solution depends on the surface quality required and the equipment available.
A 40T blade is not a universal answer.
I may choose a lower tooth count for long rip cuts in thick solid wood, where chip clearance and cutting speed matter more. I may choose a higher tooth count for fine crosscuts, veneered panels, or work that needs a more finished edge.
The saw also matters. A blade that works well on a stable table saw may not be the best match for a small handheld circular saw. The motor power, blade diameter, kerf, and cutting depth all affect performance.
Even a suitable blade can produce poor results when it is neglected.
I clean resin and dust from the teeth, store the blade where the teeth will not hit metal surfaces, and avoid forcing it through the material. When the saw sounds strained or the cut begins to burn, I stop and inspect the setup.
A sharp blade supports cleaner work and places less demand on the saw. It also makes the operator less likely to push too hard.
For my general woodworking jobs, 40T is a practical starting point when I need a balance between edge quality and cutting speed. I still check the material, the machine, and the finish standard before choosing it. A sharper cut comes from the whole setup—not from the tooth count alone.

Many fleet operators face the same pressure: move more goods, control operating costs, reduce downtime, and keep drivers safe on long routes.
That is where 40T technology attracts attention.
A 40-ton truck or transport system is not judged by its size alone. Its value comes from how well the vehicle, powertrain, safety tools, fleet software, and maintenance plan work together. When these parts support daily operations, the fleet can make better use of each trip without relying on unrealistic promises.
40T technology wins because it fits the needs of heavy-duty transport.
Payload matters, but useful payload matters more
A large truck does not automatically create better results. The key question is how much cargo it can carry within legal weight limits while keeping fuel use, handling, and maintenance under control.
For many freight routes in Europe, vehicles operate near the 40-tonne gross vehicle weight range, subject to local road rules and axle limits. A small improvement in loading efficiency can affect the number of trips a fleet needs to complete each week.
I look at three points when reviewing a 40T solution:
A vehicle may have a high total weight rating, but poor axle distribution can limit its real use. Good 40T technology helps operators plan loading with greater accuracy and avoid carrying unused capacity.
Power must match the route
A truck working on flat highways has different needs from one operating on steep roads, in heavy traffic, or across changing weather conditions.
Powertrain design affects:
For example, a 40-tonne truck moving containers between major European ports may spend long periods on motorways, followed by short urban deliveries. The best setup for this route may focus on steady highway performance, low-speed control, and simple maintenance access.
A route-based choice is more useful than selecting a vehicle only by engine output. I prefer to compare the full operating cycle rather than one performance figure.
Uptime has a direct business impact
When a heavy-duty vehicle stays in the workshop, cargo may wait, drivers may lose working hours, and delivery plans may need to change.
Modern 40T systems can support uptime through:
These tools do not remove every breakdown risk. They give fleet teams more information before a small issue becomes a larger repair.
A practical example is tire pressure monitoring. A slow pressure loss may not stop a truck at once, but it can affect tire wear, handling, and energy use. An early alert gives the operator a chance to inspect the vehicle during planned service rather than after a roadside problem.
Safety must be part of the system
A 40-tonne vehicle carries more momentum than a passenger car. Braking distance, blind spots, turning space, and load stability all require careful management.
Useful safety technology may include:
These systems support the driver. They do not replace driver training, route planning, or regular vehicle inspections.
I see the best safety setup as a layered process. The driver receives clear information, the vehicle responds in a controlled way, and the fleet manager can review safety data without turning every event into a penalty.
Data helps managers make better choices
A fleet may operate dozens or hundreds of vehicles. Paper records and scattered messages make it hard to see the full picture.
Fleet software can bring key information into one place:
This information helps managers compare routes and identify repeated problems. A truck that uses more fuel than similar vehicles may need a mechanical inspection, a load review, or driver support.
The value does not come from collecting endless data. It comes from using a few clear indicators and linking them to daily decisions.
The right purchase depends on the total operation
A 40T solution may look attractive during a product demonstration, yet the real test happens on the road.
Before choosing a system, I recommend checking:
A lower purchase price may not lead to lower costs if service access is limited. A feature-rich system may also create extra work if drivers and managers cannot use it with ease.
The strongest choice is the one that matches the fleet’s work pattern.
40T technology wins when it turns vehicle capacity into dependable daily performance. Payload, safety, uptime, route fit, and useful data all matter more than a single headline specification.
For fleet operators, the decision should stay practical. Study the routes, check the legal limits, review maintenance support, and measure the results after deployment. A good 40T system does not need exaggerated claims. Its value becomes visible through smoother planning, better vehicle use, and fewer avoidable interruptions.

A 40T cutting machine can handle demanding production work, but the process may feel difficult when material settings, die position, and pressure are not well matched. Uneven cuts, damaged edges, wasted sheets, and long setup times often come from small mistakes rather than a lack of machine power.
I find that the best results come from a simple working method: understand the material, prepare the cutting tool, set the machine with care, then check the first pieces before regular production.
A 40T machine is often used for materials such as leather, rubber, foam, felt, gasket sheets, cardboard, and other flexible or semi-flexible products. The right result depends on more than the rated force. Material thickness, hardness, surface size, die shape, and cutting speed all affect the process.
Measure the material thickness and inspect its surface. A sheet with uneven thickness may produce different cutting results across the same work area.
I also recommend checking whether the material is soft, dense, layered, coated, or reinforced. For example, a foam sheet may compress under pressure, while a rubber sheet may need a clean and stable cut line. A die setting that works for thin leather may not suit a thick gasket sheet.
Prepare enough material for a small test run. This gives you a chance to adjust the machine without affecting a large batch.
The die should match the product shape and material size. A damaged or blunt die can create rough edges and increase the force needed for cutting.
Before mounting the die, inspect:
Keep the die clean and free from material scraps. Even a small piece of waste under the die can affect cutting depth.
Place the cutting board or support surface in the correct position. The surface should be flat and stable. A worn cutting board may cause shallow cuts in one area and deeper cuts in another.
Leave enough room around the work area for safe material handling. Keep hands away from the cutting zone while the machine is operating. If the machine has a two-hand control system, use it as designed and do not bypass the safety feature.
A clean work area helps me spot alignment problems early. It also reduces the chance of material shifting during the cutting cycle.
A 40T rating describes the machine’s maximum cutting force. It does not mean every job should use the full force.
Start with a lower setting when the machine allows pressure adjustment. Run one test cut and inspect the result. If the material is not fully cut, increase the setting in small steps. This approach helps protect the die, cutting board, and material.
Too little pressure may leave connected fibers or uncut corners. Too much pressure can flatten soft materials, mark the support board, damage the die, or increase machine wear.
The correct setting is the lowest pressure that produces a clean and complete cut.
Place the material under the die and confirm its position. Make one test cut. Remove the piece and check:
A test piece can reveal problems before they spread through the whole order. For a production shop, this small step can reduce material waste and repeated adjustments.
Material movement is a common reason for uneven results. Use a guide, stop, template, or suitable holding method when the material needs to stay in one position.
Do not stack sheets beyond the machine’s working range. A thick stack may look efficient, but it can reduce cut accuracy and place extra load on the machine. The correct stack height depends on the material and die design.
For example, when cutting several layers of felt, I would test the stack height rather than assume that a thicker stack will save time. Felt compresses differently from leather or rubber, so the pressure and cutting depth may need a separate setting.
After the test cut, inspect several pieces from different positions on the work area. A machine may cut well in the center but produce a weaker result near the edge if the surface or pressure distribution is not even.
Record the useful settings for each material:
A simple record sheet helps reduce setup time when the same product returns later. It also makes training easier for other operators.
Daily cleaning removes scraps and dust from the work area. Check the cutting board, die holder, guides, and visible machine parts before use.
Follow the equipment supplier’s maintenance instructions for lubrication, hydraulic components, electrical parts, and pressure checks. Only trained personnel should inspect or repair internal systems.
Stop operation if you notice unusual noise, oil leakage, unstable movement, damaged guards, or a control problem. Continuing to run the machine may create a larger repair issue and increase safety risk.
A workshop cutting rubber gasket sheets may start with a clean die, a flat cutting board, and a small sample batch. The operator measures the sheet, places one layer under the die, and runs a test at a low pressure setting.
The first cut leaves a few connected areas. The operator raises the pressure slightly and checks the next sample. The edge becomes complete without leaving deep marks on the material. The setting is recorded, and the operator checks pieces from the center and outer areas of the work surface before regular cutting begins.
This process takes a little preparation, but it gives the operator better control over material quality and machine load.
A 40T cutting machine becomes easier to use when each job follows the same basic path: inspect the material, prepare the die, secure the work area, test the pressure, check the first pieces, and record the settings.
The machine’s force is only one part of the result. Good alignment, a suitable die, stable material handling, and regular maintenance play an equal role in clean cutting and steady production.

When my cuts look rough, the blade is often the part I check first. A dull or poorly matched blade can leave chipped edges, burn marks, and uneven lines. These problems slow down the job and may lead to extra sanding or wasted material.
A 40T saw blade can offer a practical balance between cutting speed and edge quality. It has more teeth than a coarse blade, so each tooth removes less material during the cut. This often helps produce a smoother finish on common wood projects.
For many workshop tasks, a 40T blade may suit:
I would not choose a blade by tooth count alone. The blade diameter, bore size, kerf width, tooth shape, and saw power all need to match the tool. A 40T blade made for a table saw may not fit a miter saw or a handheld circular saw.
Before fitting the blade, I check the following:
Blade size
Confirm the diameter listed by the saw maker. A blade that is too large or too small may affect safe operation and cutting depth.
Bore size
The center hole must match the saw arbor. Do not force a blade onto the tool or use an unsuitable adapter.
Material type
A blade designed for wood should not be used for metal, masonry, or other materials unless the product instructions allow it.
Cutting direction
The teeth should face the direction marked on the blade and match the rotation of the saw.
Blade condition
I look for chipped teeth, cracks, resin buildup, or signs of overheating. A damaged blade should not be used.
A simple workshop example shows where a 40T blade can help. When cutting laminated plywood for cabinet shelves, a coarse blade may leave visible chips along the top surface. Moving to a suitable 40T blade, securing the panel, and feeding the saw at a steady pace can help create a cleaner edge. The result still depends on the saw, blade quality, material, and cutting method.
Technique matters as much as the tooth count. I support the workpiece close to the cutting line, mark the cut clearly, and avoid forcing the saw through the material. A steady feed helps the teeth work as designed. If the blade starts to burn the wood or the motor sounds strained, I stop and inspect the setup.
A 40T blade is not the right choice for every cut. A lower-tooth blade may remove material faster when rough cuts are acceptable. A higher-tooth blade may suit fine trim work where the edge needs extra care. The best option depends on the material and the finish I want.
Good results come from matching the blade to the job, checking the saw before use, and keeping the cutting motion controlled. A 40T blade can be a useful choice for cleaner general-purpose wood cuts when its size and design fit the tool.
Want to learn more? Feel free to contact Hu: dgliheng168@163.com/WhatsApp +8613509684273.
International Organization for Standardization 2015 Safety of Machinery General Principles for Design Risk Assessment and Risk Reduction
Occupational Safety and Health Administration 2023 Machine Guarding Standards and Safe Operating Practices
European Commission 2022 European Best Practice Guidelines for Heavy Duty Vehicle Load Management
American National Standards Institute 2021 Industrial Machinery Safety Requirements for Presses and Cutting Equipment
Woodworking Machinery Manufacturers Association 2020 Circular Saw Blade Selection and Cutting Performance Guide
International Energy Agency 2023 Improving Energy Efficiency in Heavy Duty Road Transport Operations
Meet 40T, a fast, precise, and reliable solution built to perform when it matters most. Designed for consistent operation and dependable results, 40T combines speed, accuracy, and stability to help
Upgrade Your Shop with 40T Power and experience dependable performance built for demanding work. Designed to deliver impressive strength, consistent results, and reliable operation, 40T technology
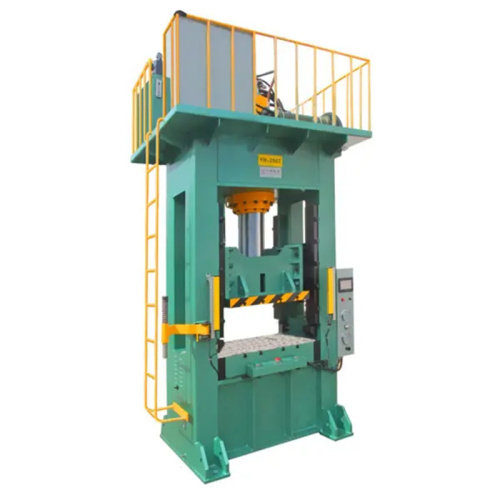
The 40T Hydraulic Press is built for demanding industrial pressing applications, delivering powerful force, dependable operation, and precise control. Its robust construction supports consistent pe
Say goodbye to frustrating jams and experience smoother, more reliable performance with 40T. Designed to help keep operations running efficiently, 40T delivers dependable results when you need them
Email to this supplier

September 22, 2026

September 21, 2026
Contact

Send Inquiry
PRODUCT CATEGORIES
Privacy statement: Your privacy is very important to Us. Our company promises not to disclose your personal information to any external company with out your explicit permission.
Fill in more information so that we can get in touch with you faster
Privacy statement: Your privacy is very important to Us. Our company promises not to disclose your personal information to any external company with out your explicit permission.